This guide covers the installation of Trusscore SlatWall integrated with Trusscore Wall&CeilingBoard. SlatWall seamlessly integrates with Wall&CeilingBoard to create a unified wall and storage system.
Video: How to Install Trusscore SlatWall with Trusscore Wall&CeilingBoard
Prior to installation, Trusscore SlatWall must be placed in the environment where it will be installed for a minimum of 24 hours. This minimizes expansion and contraction after installation and ensures the best installation quality. Loosen or remove any packaging material that may restrain the product while it is acclimatizing.
Trusscore SlatWall requires a sound structure (wood studs or masonry walls) to support the weight of the panels and anything hung from them. Ensure the structure is both strong and stable.
SlatWall panels overlap when installed. Total panel height is 7-1/8″, and the exposed face after installation is 5-7/8″.
Panels must start and finish fastened to a stud.
Studs should be no more than 16″ on-center to support the full load rating of 75 lbs per square foot.
When transitioning from Wall&CeilingBoard to SlatWall, the bottommost SlatWall panel will overlap the Wall&CeilingBoard panel by approximately 1-1/4″. Account for this overlap when planning installation height.
This overlap applies to both horizontal and vertical Wall&CeilingBoard installation orientations.
Check surfaces for straightness and install furring strips or strapping where necessary
Install wood blocking between studs around door and window openings for added trim support
Ensure all insulation and vapor barriers are installed according to local building code
If installing over drywall or another material, locate and mark each stud using a stud finder
Ensure the building is fully enclosed, HVAC is in operation, and residual moisture has been removed from the work space before starting
Plan your installation layout and appropriate spacing measurements. Leave adequate spacing (1-3/8" minimum) between Wall&CeilingBoard panels and the SlatWall panel area for the H Channel Snap-In Trim. This spacing is the same for both horizontal and vertical Wall&CeilingBoard installation orientations.
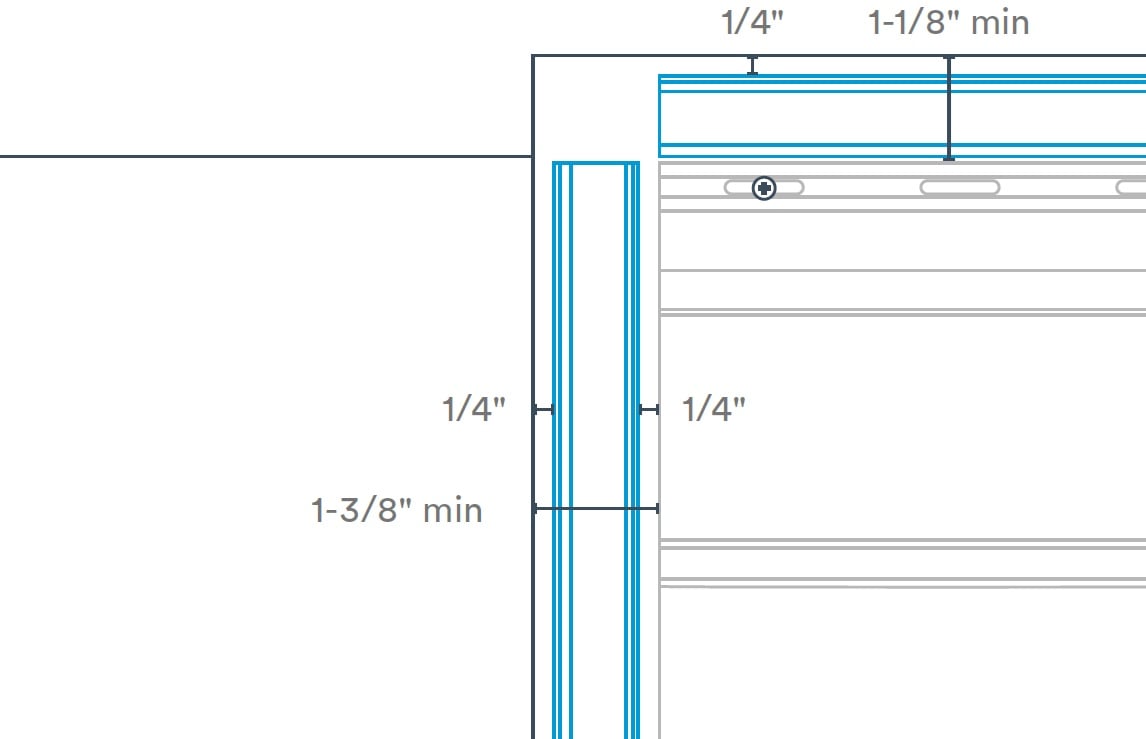
Image: H Channel Snap-In Kit Spacing Between SlatWall and Wall&CeilingBoard
Inside the SlatWall installation area, locate and mark each wall stud using a stud finder. Use a level and pencil to mark each stud from the top to the bottom of your installation area, ensuring each line is plumb.
SlatWall panels must start and finish fastened to a stud. Each panel must also be fastened to studs every 16″ on-center minimum to support up to 75 lbs per square foot.
Install your Trusscore Wall&CeilingBoard panels, leaving an opening for your SlatWall installation as determined by the spacing guidance from Step 1.
For detailed Wall&CeilingBoard installation instructions, refer to the Trusscore Wall&CeilingBoard Installation Guide.
Trusscore SlatWall installs directly above vertically and horizontally oriented Wall&CeilingBoard panels without any trims required.
When installing SlatWall panels above vertical Wall&CeilingBoard:
Rest the bottom lip on the back of the SlatWall panel directly on top of the Wall&CeilingBoard panel below it
Use a level to ensure the panel is horizontally level before fastening
When installing SlatWall panels above horizontal Wall&CeilingBoard, there are two possible configurations:
Configuration 1: Even Increment Installation
If the distance from the floor to the bottom of the first SlatWall panel is an even increment of 16″ (the width of the exposed face of Wall&CeilingBoard panels), the SlatWall panel will rest directly on top of the full-width Wall&CeilingBoard panel.
Configuration 2: Custom Height Installation
If the desired distance from the floor to the bottom of the first SlatWall panel is not an even multiple of 16″, rip the Wall&CeilingBoard panel closest to the floor to an appropriate width to achieve the desired SlatWall height.
Before installing the first (bottom) SlatWall panel:
Use a level to verify that the Wall&CeilingBoard panel you're connecting with has been cut and installed in a level, straight line

Fasten the SlatWall panel to the wall through the screw flange and into each available stud
Do not overtighten the screws—this will disrupt the installation of subsequent panels
Starting from the bottom, install the remaining SlatWall panels.
Place a panel on top of the previously installed panel, aligning the ends of both panels.
Starting at one end and moving to the other, apply gentle downward pressure (towards the floor) to interlock the panel with the previously installed panel below. You will feel and hear a "snap" when the panels have properly interlocked.
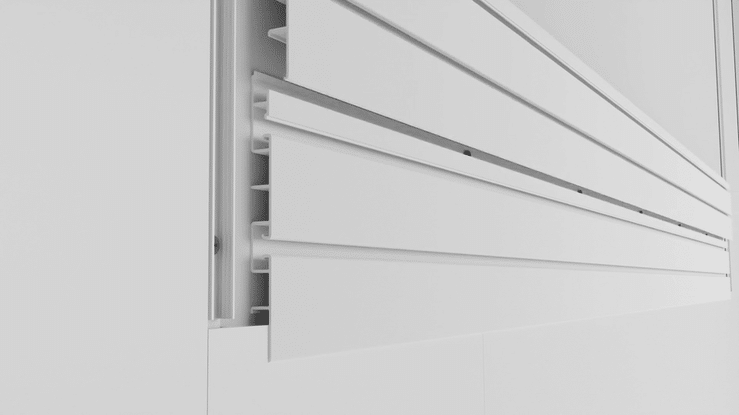
GIF: See How Trusscore SlatWall Panels Connect
Fasten the panel by drilling a screw through the slotted screw flanges into each of the studs you marked earlier.
Repeat Steps 1-3 for all remaining panels.
An H Channel Snap-In Kit Trim accommodates the transition between the ends of SlatWall panels and any adjacent Wall&CeilingBoard panels.
The H Channel Snap-In Trim kit includes two components:
H Channel Snap-In
U Channel base
Ensure the U Channel Base is removed from the H Channel Snap-In Trim before starting.
Using a power saw, cut the end of an H Channel Snap-In Trim at a 45° (mitered) angle. For best results, place the finished face of the trim upwards to perform the cut.
Place the H Channel Snap-In Trim up to your installation area and make a mark where it meets the bottom edge of the bottommost SlatWall panel. Cut the H Channel Snap-In Trim square at this mark.
Measure and mark 1-1/4″ inwards from the bottom edge (end) of the H Channel Snap-In Trim. At the mark, make a vertical snip in both grooved standoffs using tin snips.
Using the tip of the tin snips, remove the remaining stand-off material between your vertical snip and the bottom edge (end) of the trim. The remaining material should be small enough to allow the H Channel Snap-In piece to sit flush overtop of the Wall&CeilingBoard panel below it, without obstruction.
An H Channel Snap-In Trim accommodates the transition between the top of SlatWall panels and any Wall&CeilingBoard panels placed above it.
Position the U Channel base to ensure that when the H Channel Snap-In is inserted in place, the lip at the outer edge of the H Channel Snap-In aligns with the top row groove of the SlatWall panel.
When fastening the U Channel base to the wall, leave a gap of approximately 1/4 between the U Channel base and the Wall&CeilingBoard installed above the SlatWall area.
For more information about installing Trusscore SlatWall, download our detailed installation guide.
